
Spotify Playlist of the Week: A Musical Day
July 23, 2017
Spotify Playlist of the Week: Swingin’ 40’s
July 31, 2017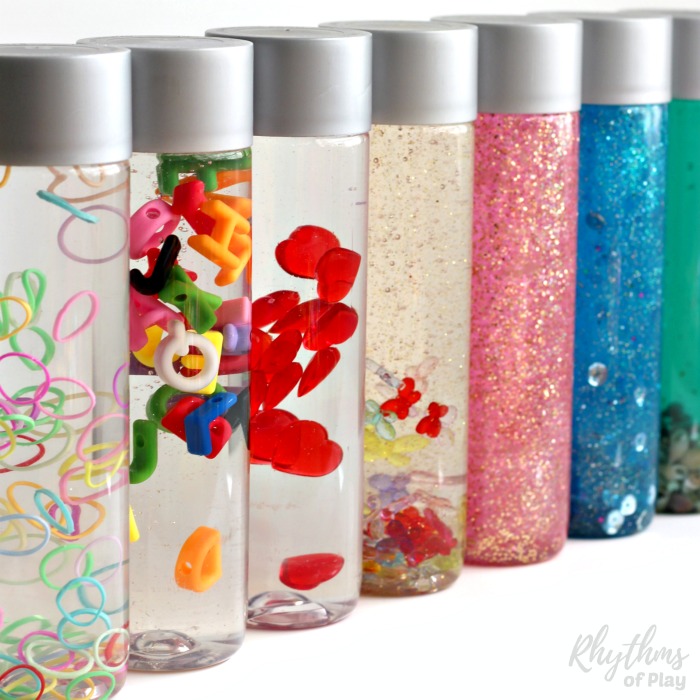
Hello everyone!
Prepare to become mesmerized with these eye-catching sensory bottles! We are back at Autism Society of Minnesota’s Wahode Day Camp this week and we threw some new fidgets into our basket – sensory bottles! They are fairly easy to make and most of the supplies may already be in your household! We found over half of the supplies at our local dollar store. Other supplies were found at grocery and craft stores.
Possible sensory bottle containers:
- VOSS bottles (plastic)
- ICE plastic bottles (this is what we used!)
- Plastic spice/sprinkle containers
- Any plastic water bottle/container
Sensory bottles require two main components: liquid(s) and dry ingredient(s)
Possible liquids to use:
- Water
- Oil (cooking oil, baby oil, oil dye, mineral oil)
- Liquid soap
- Shampoo (may create bubbles!)
- Glycerine
- Light corn syrup
- Glitter glue
- Food coloring
Possible dry ingredients to use:
- Glitter
- Acrylics
- Beads
- Marbles
- Jewelry crafts
- Buttons
- Sequins
Basic instructions:
- Thoroughly clean the bottle
- Remove any unwanted labels (stickers/paper)
- Fill container with preferred liquids and dry ingredients (see below for our designs)
- Tightly put the lid back on the bottle
- Seal the cap with hot glue or duct tape – you may have to re-seal the cap time to time, depending on how much the sensory bottle is used.
Be creative, almost anything can be put in a sensory bottle! If you’re looking for some ideas, we have some for you!
Glitter Sensory Bottle


Ingredients
- Warm water
- Glitter glue
- Glitter (dry ingredient)
Directions
- Fill container with luke warm water (this helps the glue mix better)
Add glitter glue ( the liquid) into the container - Add glitter (dry ingredient) into the container
- Tightly put the lid back on the bottle
- Shake the bottle well, until all ingredients are mixed together
- Seal the cap with either hot glue or duct tape (you can choose the design and color of the tape!)
- Enjoy!
Color Mixing Sensory Bottle

Ingredients
- Liquid watercolors
- Wilton Primary Candy Dye Color Set (oil dye)
- Mineral oil
- Clear corn syrup
- 1 or 2 funnels
Directions
This bottle will contain half of a corn syrup mixture and half of a mineral oil mixture. Feel free to choose whichever colors you want – we decided blue and yellow because when it mixes, it creates green!
- In a separate mixing container (that’s about the size of your sensory bottle), fill half of it with corn syrup and mix in a couple drops of the liquid watercolor until you achieve the color you want.
- After you’ve achieved your desired color, pour the corn syrup mixture in your sensory bottle container using a funnel.
- In a separate mixing container (that’s about the size of your sensory bottle), fill half of it with mineral oil and a couple drops of oil dye until you achieve the color you want.
- After you’ve achieved your desired oil color, pour the oil in your sensory bottle using a funnel.
- Seal the cap with either hot glue or duct tape (you can choose the design and color of the tape!)
- Enjoy!
We use these sensory bottles during relaxation time and our campers love them! We hope you enjoy making this DIY craft! Let us know what materials you used for your sensory bottles and feel free to send us some photos!
Alannah Forstner, Toneworks Music Therapy Intern
